


GB – Use the translation tool above to change the language
FR – Utilisez l'outil de traduction ci-dessus pour changer la langue
DE – Verwenden Sie das obige Übersetzungstool, um die Sprache zu ändern
IT – Utilizzare lo strumento di traduzione di cui sopra per cambiare la lingua
ES – Utilice la herramienta de traducción anterior para cambiar el idioma
JP – 言語を変更するには、上記の翻訳ツールを使用してください
CN – 使用上面的翻译工具来更改语言
-
Minimum System Requirements
No results were found
-
Minimum system requirementsMac or PC running Adobe CC or higher
-
Recommended inks for analogue printingYou can use your own preferred inks, however, if you wish to print using inks recommended by Touch7, we recommend the following inks:
Recommended ink
T7-NeonBlue > Pantone® 801
T7-NeonPink > Pantone® 806
T7-NeonYellow > Pantone® 803
PANTONE® is the property of Pantone LLC. All other trademarks or registered trademarks are the property of their respective owners. © Pantone LLC, 2017. All rights reserved.
-
-
Mapping to your devices neon fluorescent inks
No results were found
-
Mapping to your devices neon fluorescent inksAt the RIP/DFE, assign the Touch7 spot colour to the corresponding ink on your press – For example, T7-NeonPink would be printed with the Pink ink on your printing device. See example below as demonstrated using the Fiery RIP.
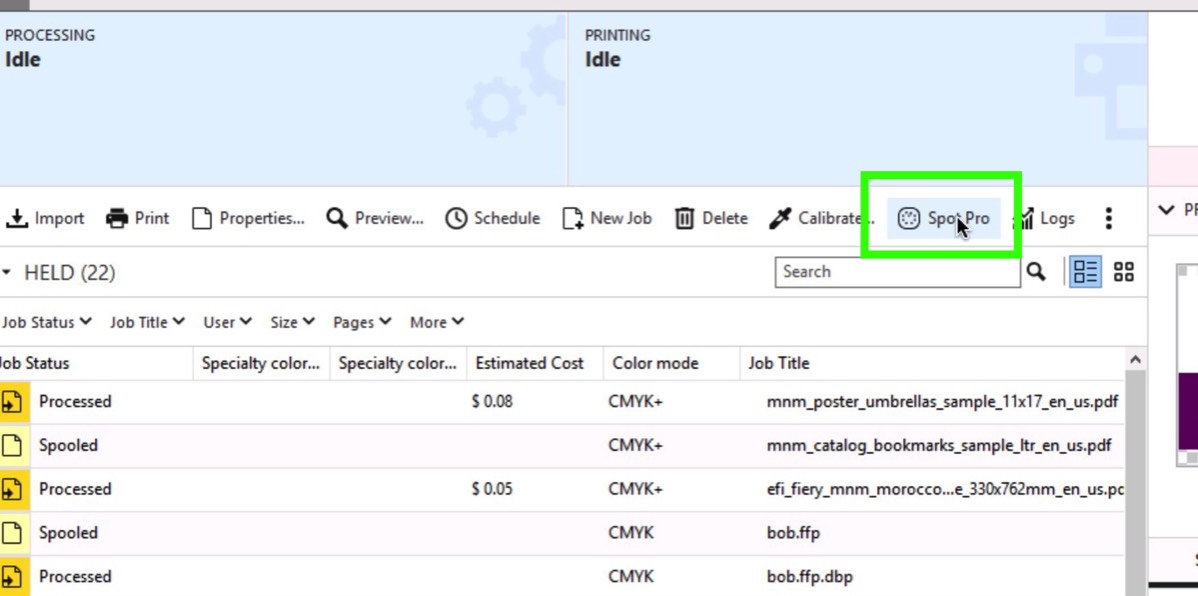 Step 1: Click on "Spot Pro"
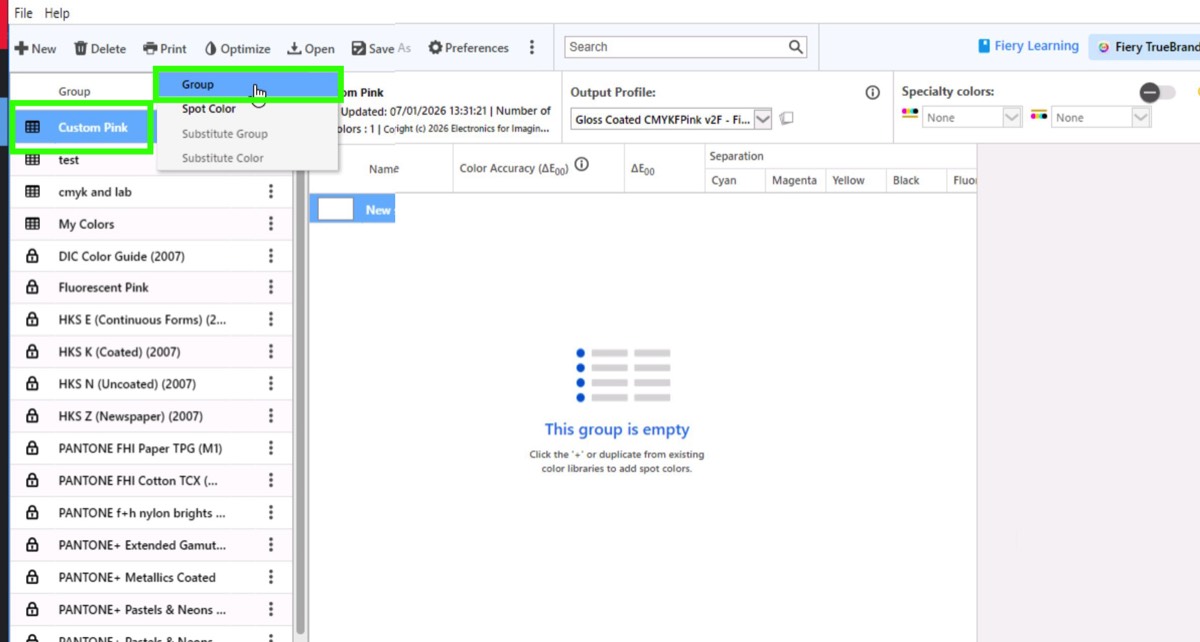 Step 2: Click on "Custom Pink > Group"
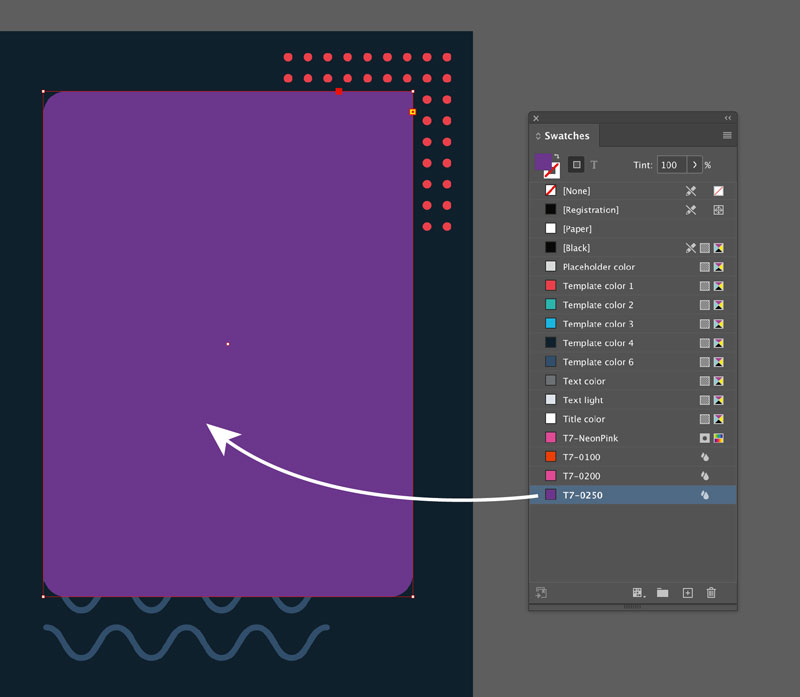
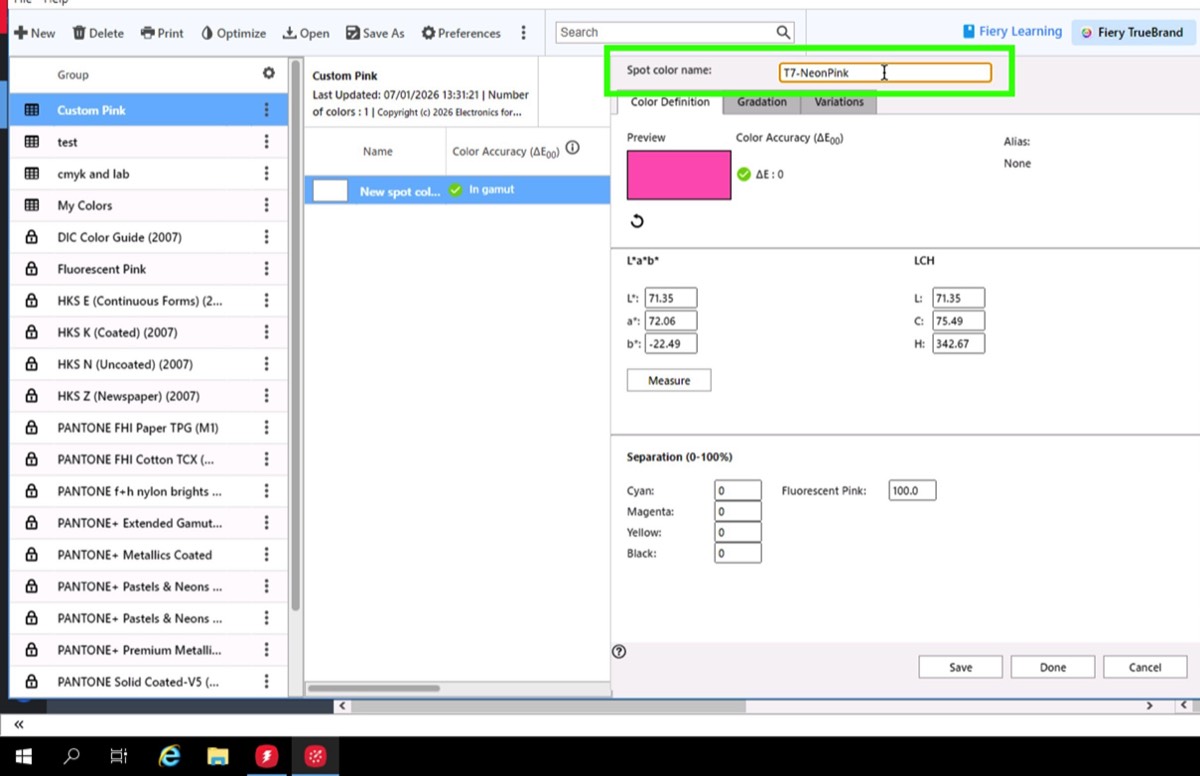 Step 3: Create a new spot color called "T7-NeonPink"
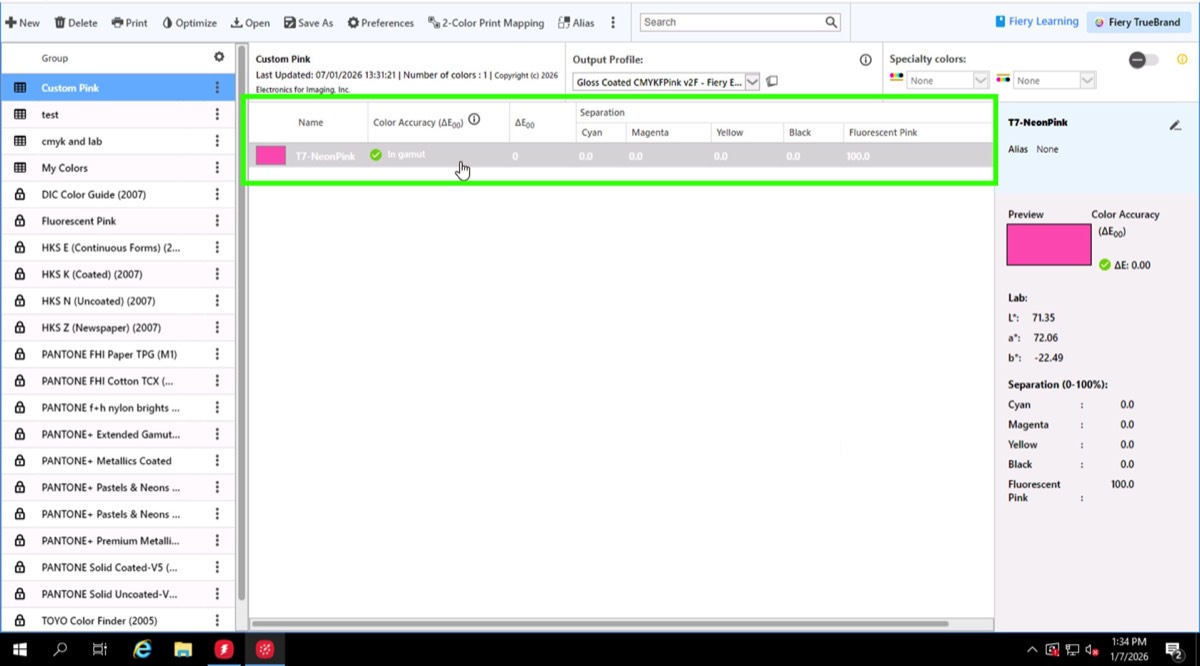 The T7-NeonPink" will now be printed using the Neon/Fluorescent ink.
-
-
Installation
No results were found
-
Swatch Books – Print these out on your press. This is your neon color system to choose colors fromSuitable for both analogue and digital printing devices, the Touch7 Neon Color System™ is comprised of two separate swatch book systems:
Touch7 Primary™ Neon/fluorescent inks are printed in combination with the primary process inks (CMY plus Neon).
Touch7 Pure™ This swatch book uses only the neon/fluorescent inks – Neon Cyan, Neon Pink and Neon Yellow. Swatch book templates
We also provide this information as single sheet color charts or shade cards (like a pack of playing cards)
The swatch book templates should be printed out on your press using your CMYK press profile, making sure that your neon color has been linearized.
The swatch book shows all the colors that are achievable using the Touch7 Neon Color System. Each color in the swatch book has a unique color name, for example, T7-0160.You only need to print out the swatch book for the corresponding inks on your press. For example, if you only have Neon Pink, you should only print the Neon Pink swatch book.
Log into the MEMBERS area on the Touch7 website and navigate to the NEON COLOR SYSTEM page- Go to the SWATCH BOOKS TEMPLATES section.
- Download the swatch book templates (or the color charts, shade cards)
- Open the swatch book templates and add your logo and business information where indicated
- Save the file as a PDF and send it to the press. Output using your CMYK press profile – this ensures you have a 100% color accurate system to choose colors from.
The screenshot below shows the SWATCH BOOK TEMPLATE section: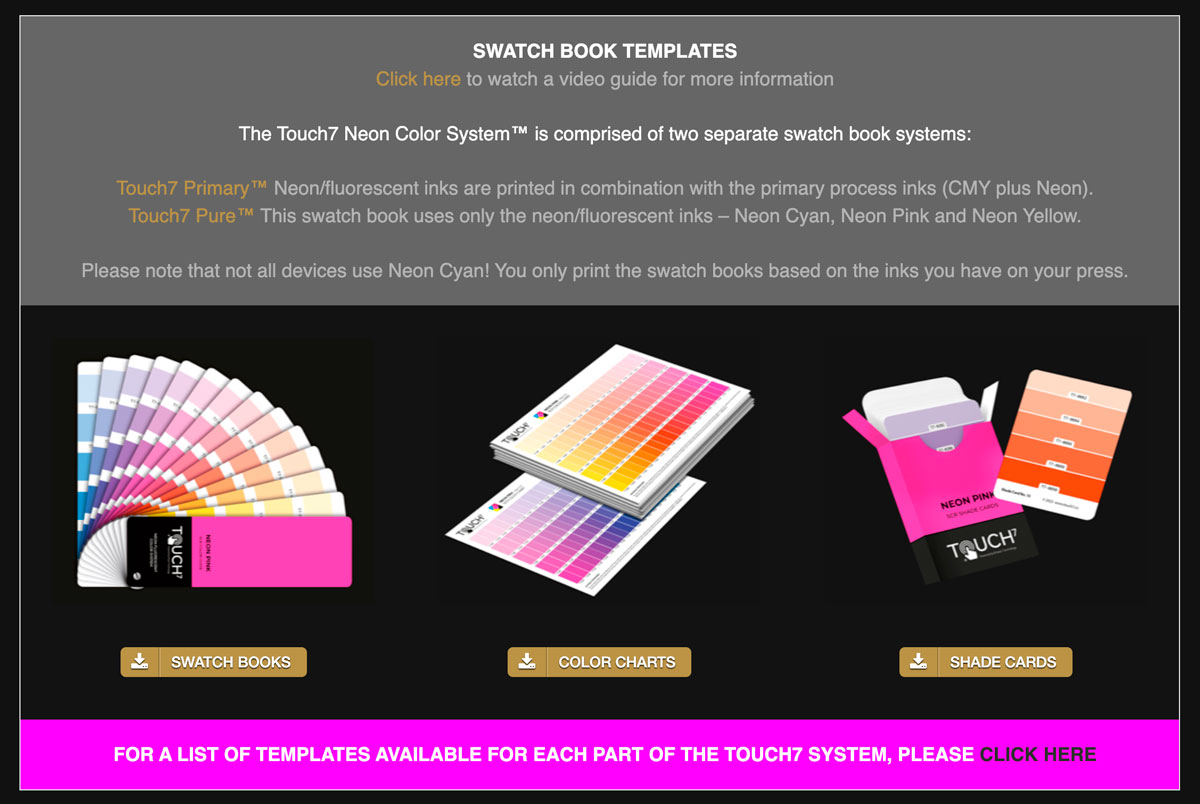
-
Color Palettes – Use these to design with using Adobe Illustrator or InDesign.Color Palettes
Automated color palettes for Adobe Illustrator© and InDesign© – Drag and drop your chosen color onto your artwork and it will automatically separate your design into the appropriate color builds. Now you can design with bright neon colors, subtle pastel shades and deep luxurious hues, expanding the gamut of your print.Log into the MEMBERS area on the Touch7 website and go to the NEON COLOR SYSTEM page- Go to the COLOR PALETTES INSTALLER section.
- Download and run the installer for either Mac OS or PC
This will install the color palettes for Adobe Illustrator and InDesign onto your computer. Please see the Touch7 tutorial section for Illustrator and InDesign to see where the palettes are location and how to use them.
The screenshot below shows the COLOR PALETTES INSTALLER section: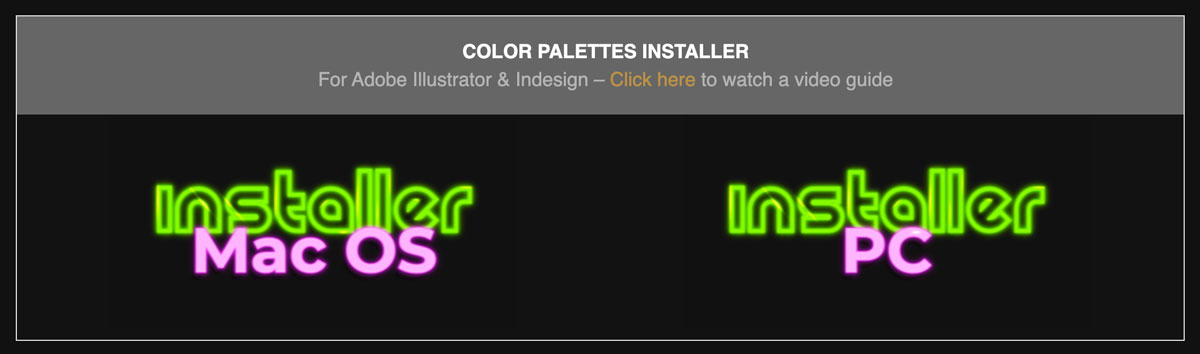
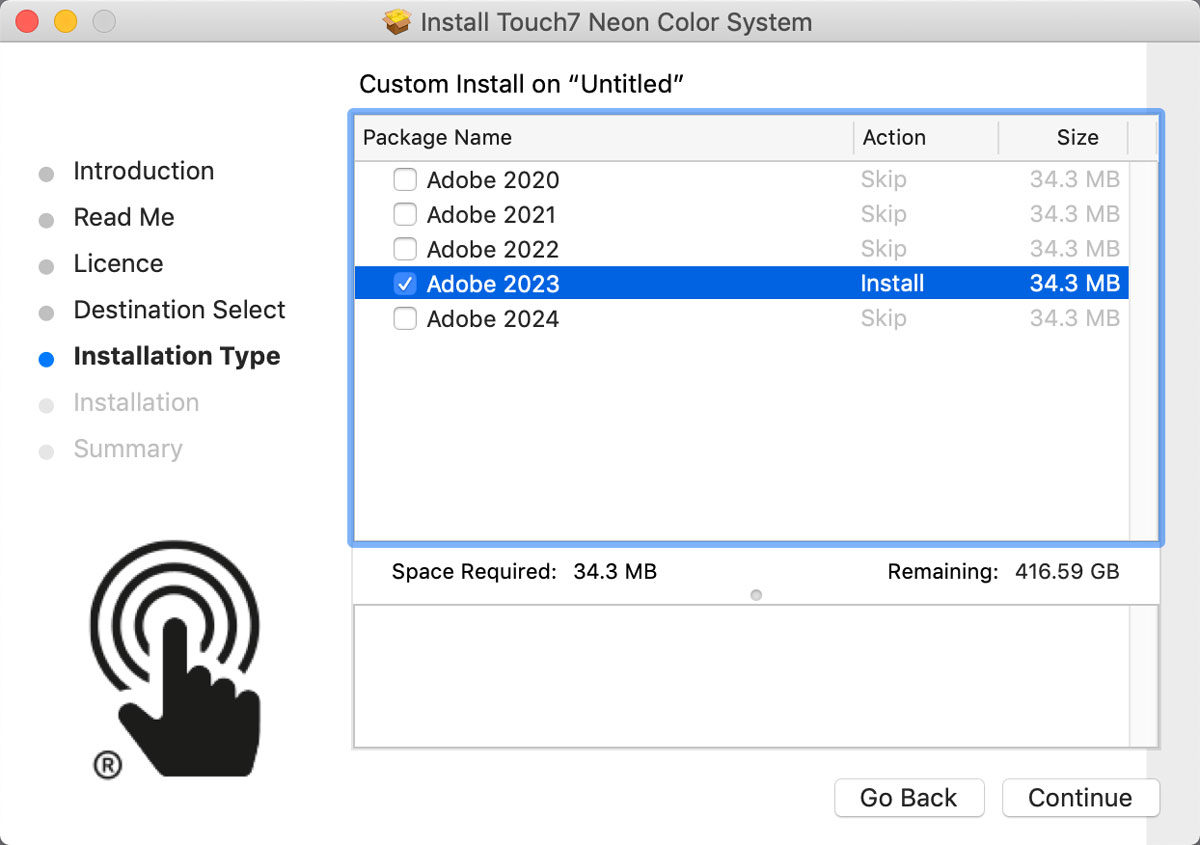 To install the Touch7 Neon Color System (Color palettes for Adobe Illustrator and InDesign) double click the installer and follow the instructions – when prompted, select the version of Adobe you are using.
If you get a security warning about not being able to open the installer, please "Right Click" on the installer and then select, OPEN.
Our installers will install the Touch7 components for the following languages:
International English, US English, French, French Canadian, German, Spanish, Italian, Dutch, Arabic, Israel English, Turkish, Japanese, Chinese and Russian – if your language is not supported, please contact us for assistance. -
Touch7 Photo v2.1 or higher – Adobe UXP compatible pluginHow to download and install the Touch7 Photo Neon PluginDownload and double click the Touch7 Photo Neon v2.1.ccx plugin.
This will automatically open up Adobe Creative Cloud and allow you to install the plugin.
_______________________________
If you encounter any issues with the above installation process you can also install UXP plugins using ZXP Installer:
Step 1 Download and install ZXP Installer from here: www.aescripts.com
Step 2 Open ZXP Installer
Step 3 Drag the Touch7 Photo Neon v2.1.ccx onto the UXP icon on the ZXP Installer AppHow to register a 7 day trial license or register the full product with a license codeOpen the plugin from the PLUGINS menu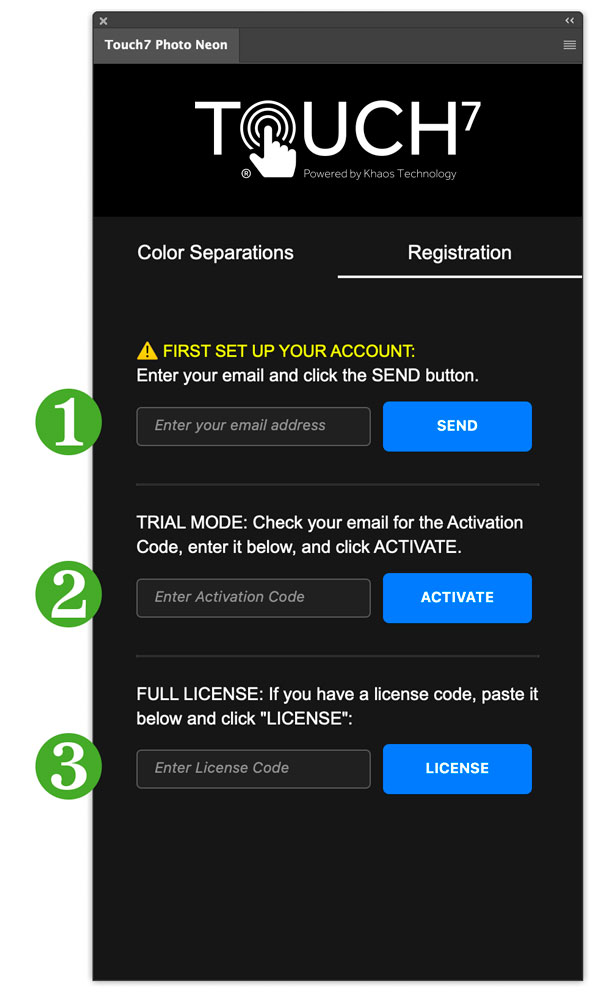 ❶ ACCOUNT SETUP
Type your email address and click the “SEND” button — This sets up an account in our system.❷ TRIAL MODE:
Check your email for an Activation code —paste that code and click the “ACTIVATE” button.
The plug-in will now work in demo mode for 7 days. Trial licenses are restricted to 72dpi @ 1200px output size.❸ FULL LICENSE:
If you have purchased a license code type it in here and press the “LICENSE” button to unlock the full Touch7 Photo plug-in. Your plug-in will now work for the duration of your license.If you have any problems registering your Touch7 Photo NEON plug-in, please contact us for assistance at support@touch7.co
-
-
Information about the different types of Neon Swatch Books and palettes
No results were found
-
IntroductionSuitable for both analogue and digital printing devices, the Touch7 Neon Color System™ consists of two separate swatch book systems:
Touch7 Primary™
Neon/fluorescent inks are printed in combination with the primary process inks (CMYK plus Neon).
Touch7 Pure™
This swatch book uses only neon/fluorescent inks – Neon Cyan, Neon Pink, and Neon Yellow. No CMYK inks are used. -
Touch7 Primary™The Neon/fluorescent inks are printed with the primary inks on the press (CMYK + neon/fluorescent)
The Touch7 Primary swatch books are available in two formats, each of which creates a different color gamut.
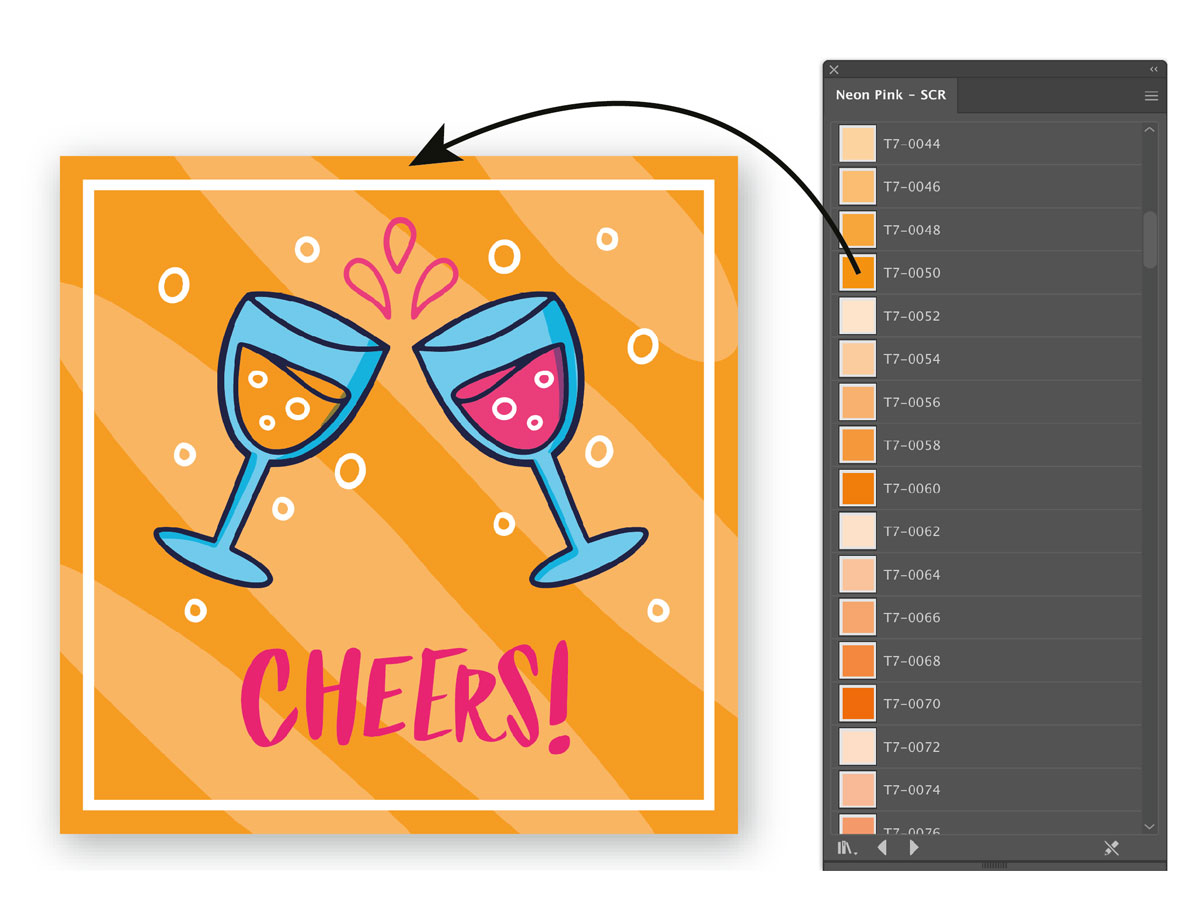
Note: In this example, we will use the Neon Pink swatch book. However, the same information applies to all our neon swatch books (Neon Cyan, Neon Pink, and Neon Yellow).SCR Swatch BooksSCR stands for "Source Color Removal". It is the same process used in our Photoshop plugin, where a specific color is removed from the design and replaced with Neon ink.
In this example, using the Neon Pink SCR swatch book, magenta is removed from all the colors and replaced with Neon Pink. This creates cleaner, more vibrant colors and pastel shades.
This swatch book prints using Cyan, Yellow, and Neon Pink.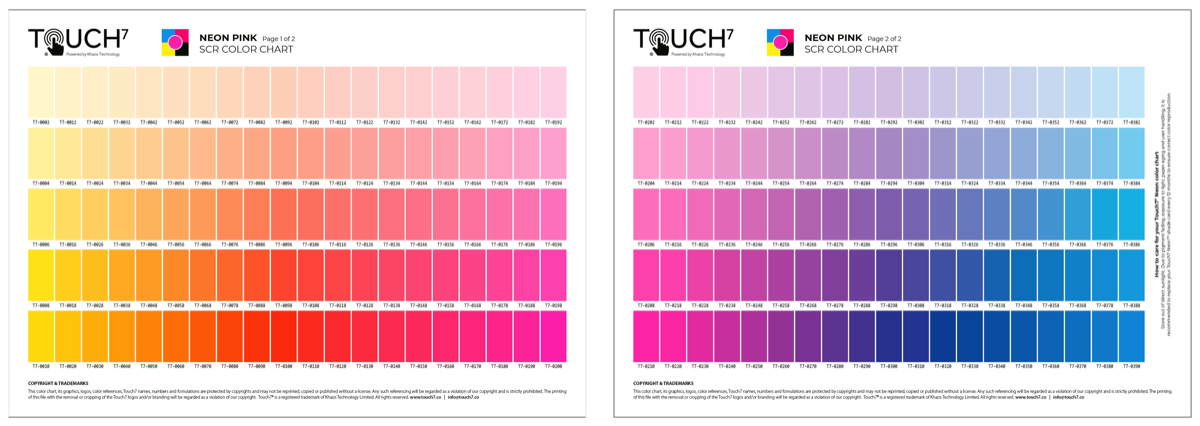 Overprint Swatch BooksIn this example, using the Neon Pink Overprint swatch book, magenta is added to all the colors. This addition creates a deeper and more saturated range of colors.
This swatch book prints Cyan, Magenta, Yellow, and Neon Pink.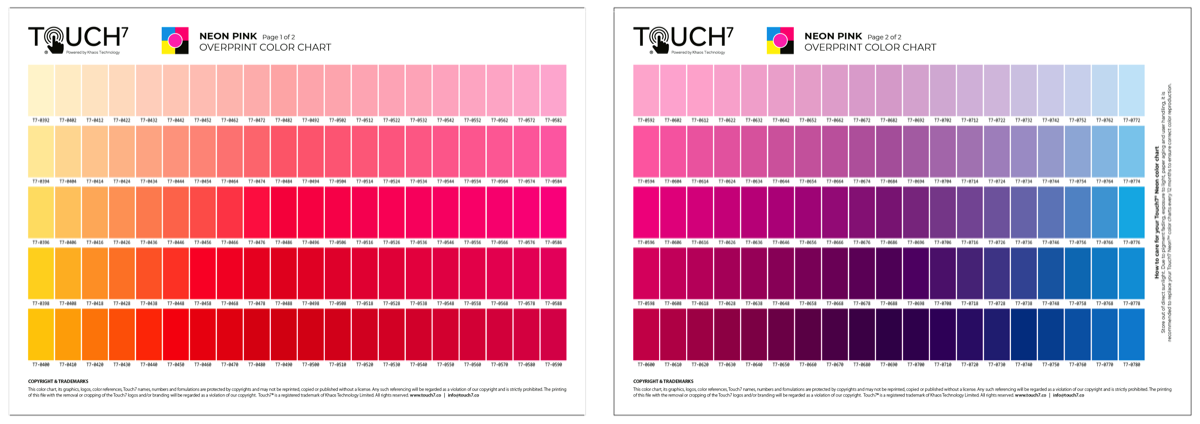 Touch7 Primary™ Color palettes – How they work with the swatch bookThe Touch7 color palettes for Adobe Illustrator and InDesign correspond to the swatch book you have printed out on your press. To use a color from your printed swatch book in your design, find the desired color in the swatch book and then use the corresponding color from the digital color palette in Adobe Illustrator or InDesign.
For example, if you have printed out the Touch7 Primary™ swatch book and want to use Neon Pink, you would select the corresponding Neon Pink swatch palette in your design software -
Touch7 Pure™Neon/fluorescent inks are printed on their own – no CMYK is used!
There is only one swatch book for the Touch7 Pure System.
The full color gamut for the Touch7 Pure swatch book uses Neon Cyan, Neon Pink, and Neon Yellow. However, not all printing devices have Neon Cyan. Therefore, you should only output the section of this swatch book for the inks available on your press.
For example, if you only have Neon Pink and Neon Yellow on your press, only print out the Neon Pink + Neon Yellow part of the swatch book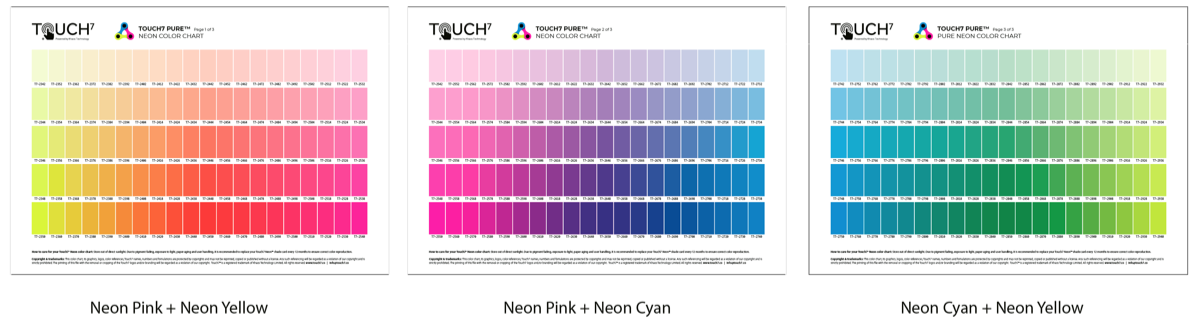 Touch7 Pure™ Color palette – How it works with the Touch7 Pure swatch bookThe Touch7 Pure color palette for Adobe Illustrator and InDesign corresponds to the Touch7 Pure swatch book you have printed on your press. Using your printed swatch book, find a color you want to use in your design, and then select the corresponding color from the digital color palette within Adobe Illustrator or InDesign
 -
Where to find the Swatch Book templatesYou only need to print out the swatch book for the corresponding inks on your press. For example, if you only have Neon Pink, you should only print the Neon Pink swatch book.
Log into the MEMBERS area on the Touch7 website and navigate to the NEON COLOR SYSTEM page- Go to the SWATCH BOOKS TEMPLATES section.
- Download the swatch book templates (or the color charts, shade cards)
- Open the swatch book templates and add your logo and business information where indicated
- Save the file as a PDF and send it to the press. Output using your CMYK press profile – this ensures you have a 100% color accurate system to choose colors from.
The screenshot below shows the SWATCH BOOK TEMPLATE section:
-
-
Touch7 Photo Neon v2.1 or higher — how it works
No results were found
-
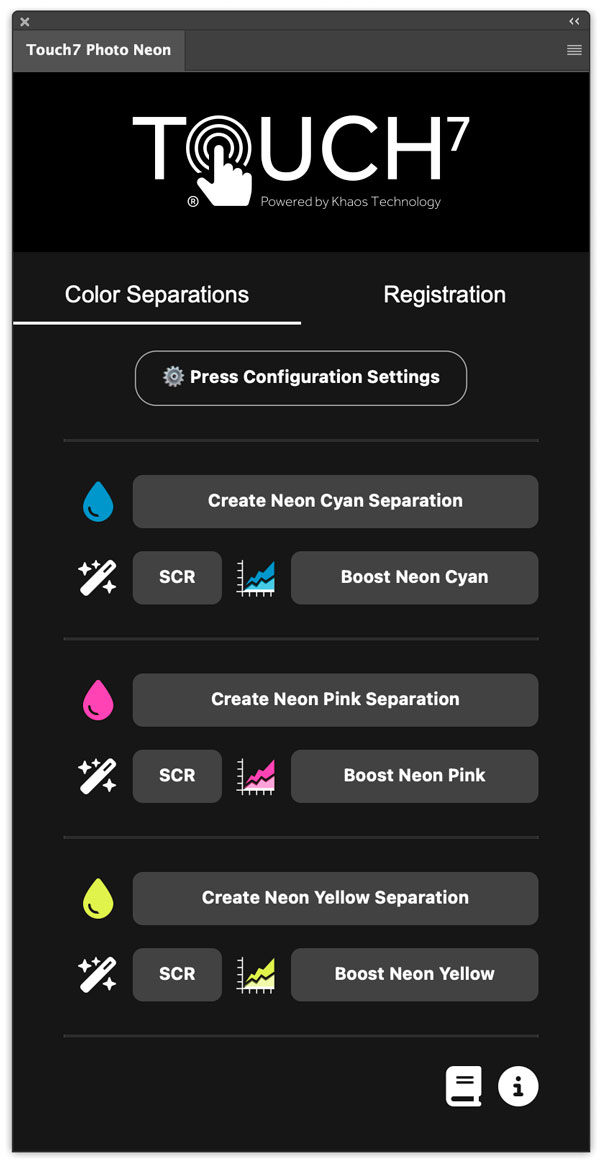
Where to find the Touch7 Photo plugin in Photoshop?Touch7 Photo Neon v2.1 or higher:
Your extension should be available from: PLUGINS > Touch7 Photo Neon™ -
Select a Press Configuration SettingAll presses use slightly different coloured neon/fluorescent inks. It's important that you use the correct press partner from the Press Configuration Settings menu
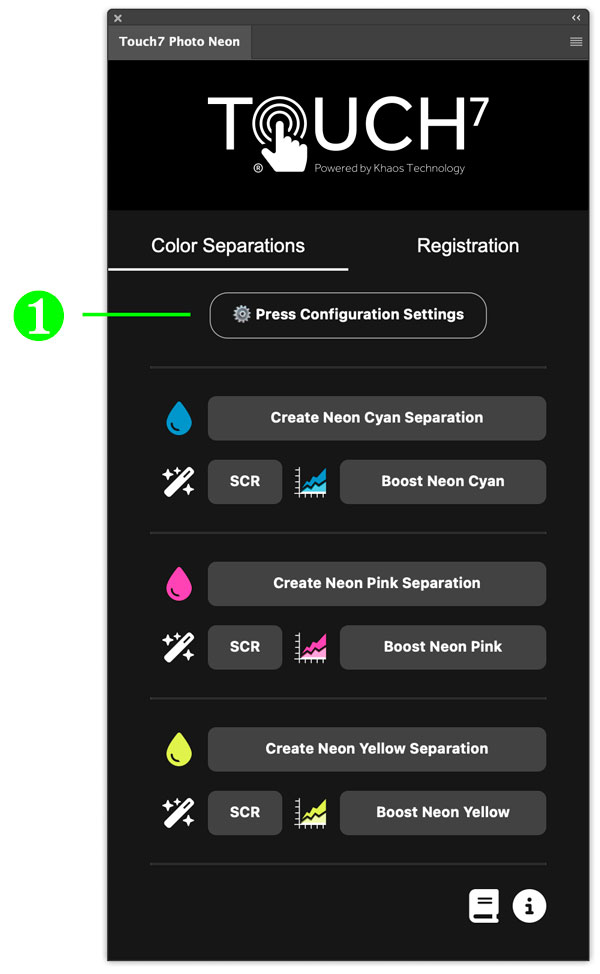 Click on Press Configuration Settings
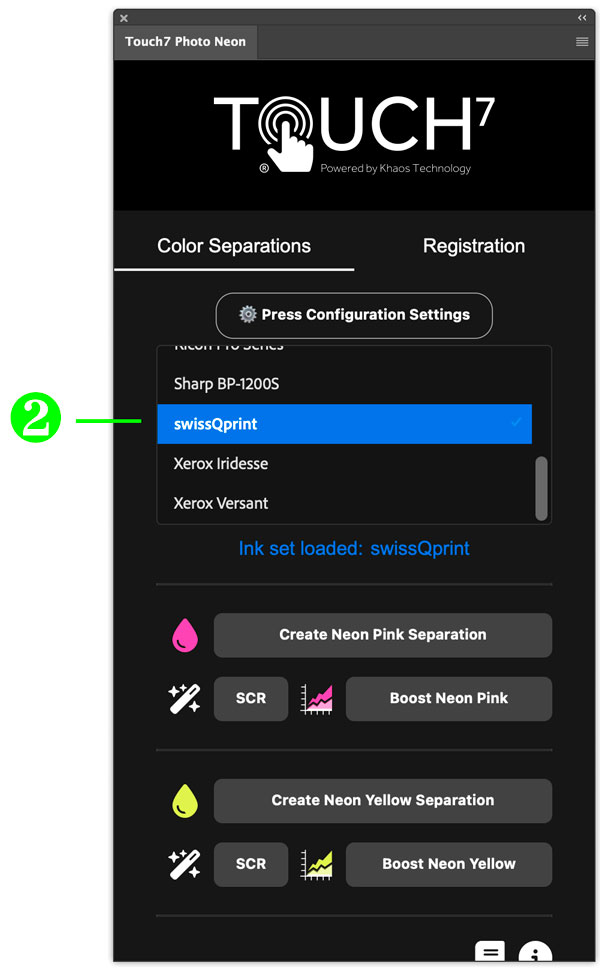 Select your specific press or ink setting
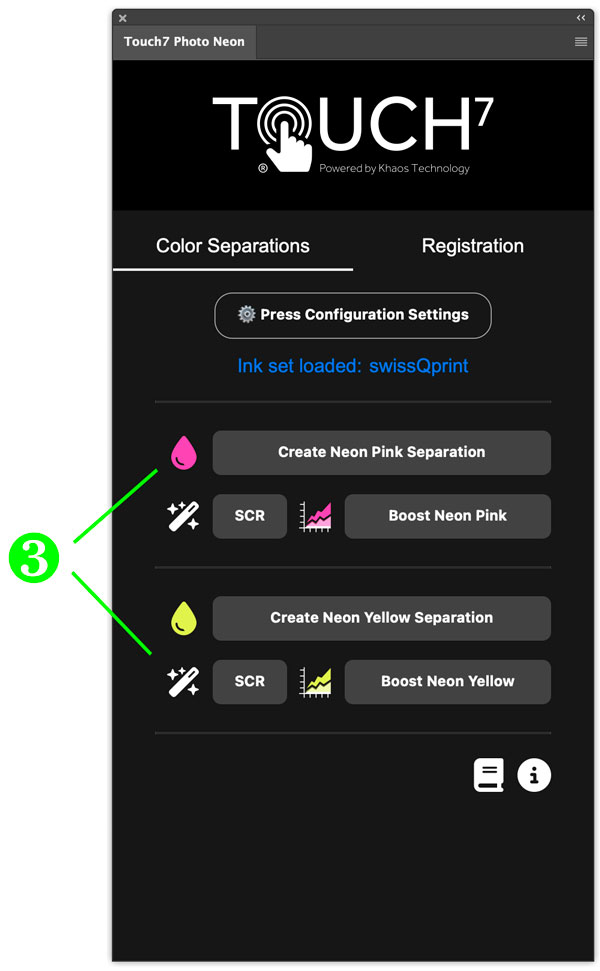 The appropriate ink buttons will load into the Plugin
 -
Converting an image
 There are three primary buttons for each color:
Create Neon Separation
Generates a neon/fluorescent separation for your image.
SCR
Creates three separate layers with varying levels of color removal (see the SCR section for details). This allows you to choose the best option for your specific image, as different images respond better to different SCR settings.
Boost
Enhances the neon/fluorescent separation in 25% increments, adding extra vibrancy to the neon channels.
TIP: You have full control over where the neon inks will print. You can edit the Touch7 Neon spot channel in Adobe Photoshop—use tools like the Eraser or Dodge tool to remove areas where you don’t want neon/fluorescent inks. -
Manually assign a specific LAB value to your neon/fluorescent channelIf your press or ink set is not available in our Press Configuration Settings, you can manually assign a LAB value after creating the spot color. Simply use the Touch7 preset colors in the plugin and follow these steps:
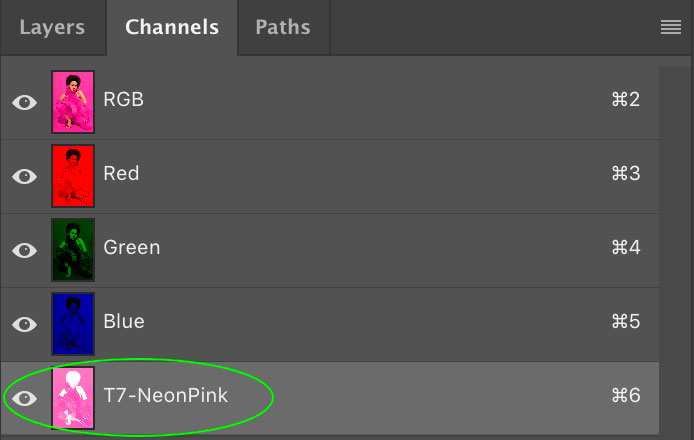 Double click your Touch7 Neon spot channel. In this example we are using the Neon Pink channel.
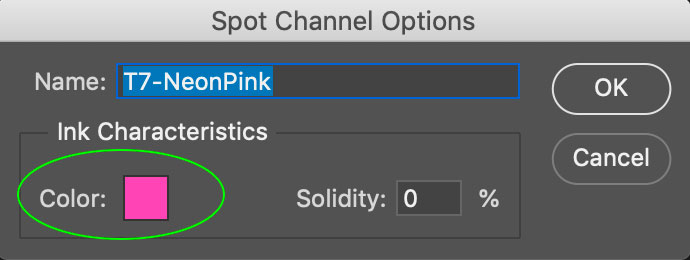 The Spot Channel Options window will open – Click on the Color box
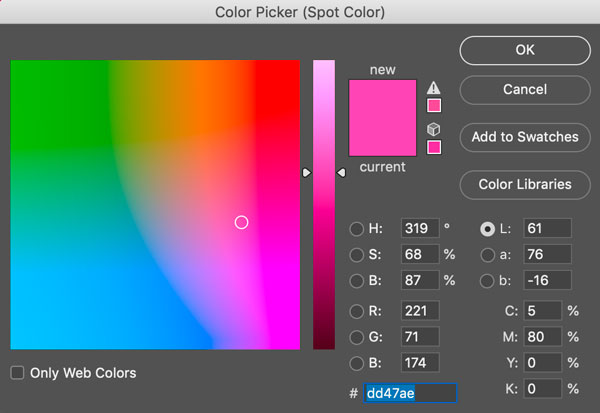 The Color Picker window will open.
Note: If a color library (e.g., Pantone) appears instead, click the PICKER button to switch to the Color Picker window.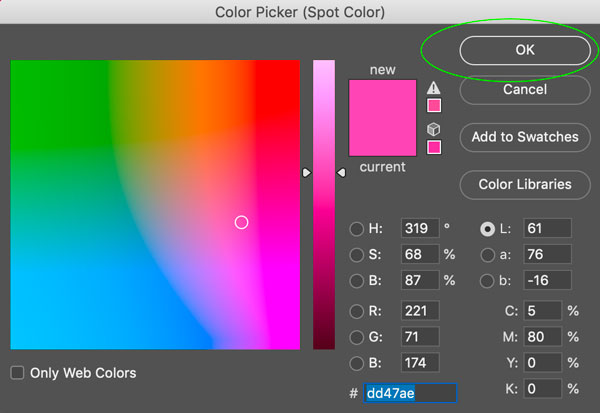 Assign your specific inks LAB value to the settings and click on OK
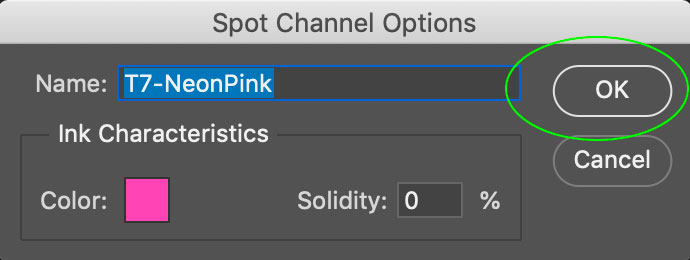 Click OK in the Spot Channel OptionsYour assigned LAB value is now applied, and the SCR and Boost buttons will use it for future calculations.
TIP: You can create an action set of the above process to speed up your workflow. -
Selective image enhancement
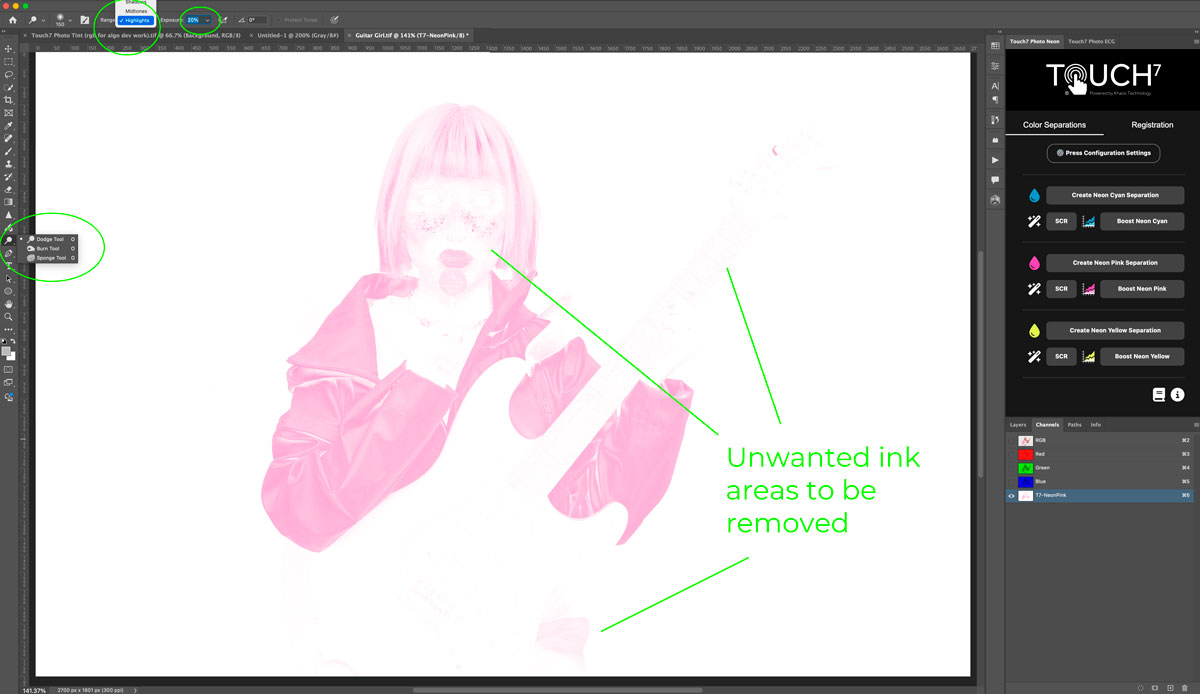 You're in complete control of where the neon ink prints!
During separation, our algorithm may pick up colored pixels in areas you don’t want to enhance. Since neon ink is a 5th color that adds to printing costs, it’s best to remove any unnecessary areas from the neon spot color.
Working in Photoshop, you can use any familiar tools, but we recommend the Dodge Tool:
Set it to Highlights
Adjust the exposure to around 20%
Gently remove unwanted neon pixels, especially in highlight areas
For a detailed walkthrough, check out the Touch7 Photo training video.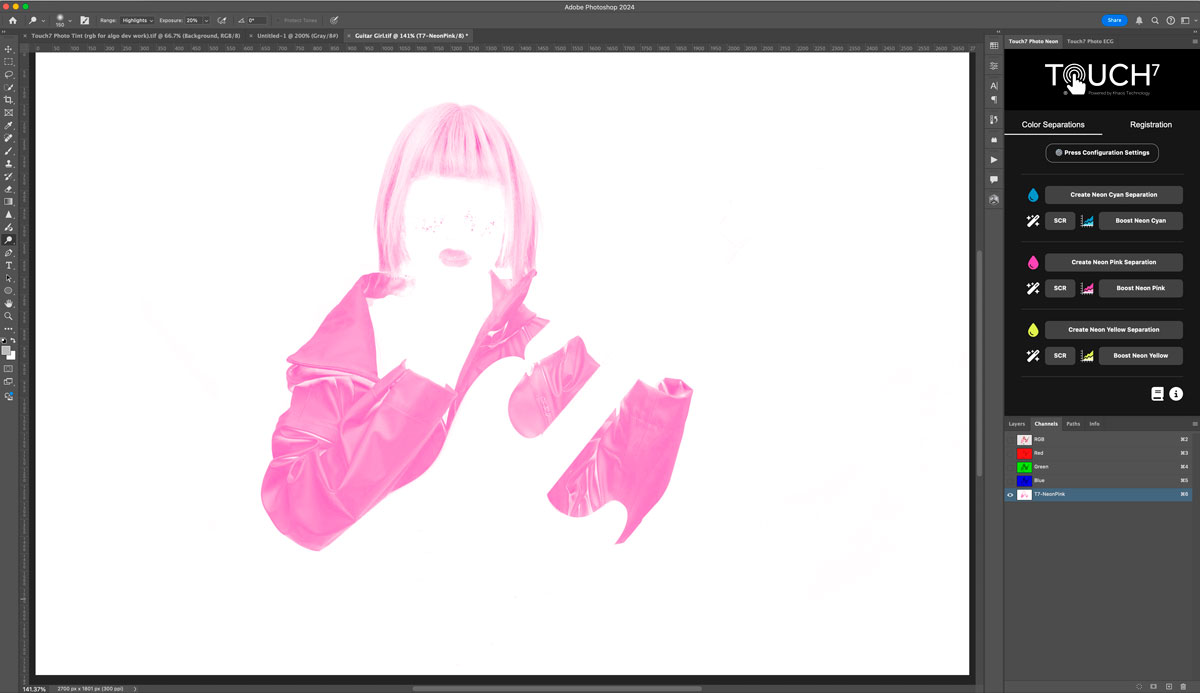
-
SCR (Source Colour Removal)SCR functions similarly to UCR (Under Color Removal), but instead of reducing ink in shadow areas, it removes the equivalent hue of the Touch7 spot colors from the original image. This is especially useful when you want to extract a specific color range and replace it with neon ink on your press.
 How SCR Works
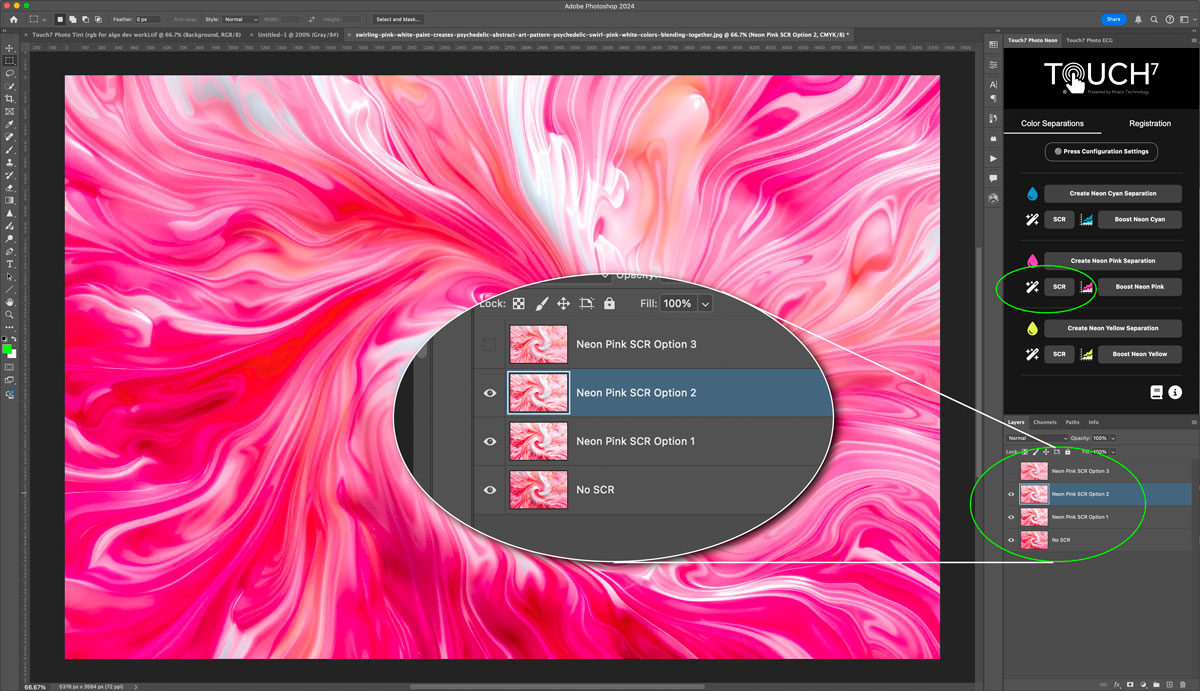
The SCR button generates three additional layers alongside the original image, each using a different mathematical algorithm to calculate color removal. This allows for precise replacement with the neon spot color.
Using SCR in Photoshop
Press the corresponding SCR button — Open the Layers Palette – You’ll see four layers:
No SCR – The original image. If printed as-is, the neon spot color will overprint on top (No SCR is applied).
SCR 1, SCR 2, SCR 3 – Each layer applies a different color removal method. Toggle layers on/off to compare results.
Choosing the Best Option – You can preview the different effects or print all four versions to determine which one works best for your design.
Processing Multiple Neon Colors – If your image contains more than one neon color (e.g., Neon Pink & Neon Yellow), you’ll need to apply SCR separately for each.
Note: All images are converted to CMYK using your Photoshop color settings. -
Working with RGB or CMYK imagesTouch7 Photo Neon supports both RGB and CMYK images. However, when using the SCR feature, the final separated image will be converted to CMYK, following the calculated SCR adjustments.
-
Further enhancing your generated neon separationsYou have full control over your image and can enhance the neon effect using Levels in Photoshop.
For example, to add more neon color to a specific area:
Make a Selection – Select the part of the image where you want to increase the neon effect (e.g., the left side).
Adjust Levels – Open the Levels adjustment and move the shadow slider (left slider) to the start of the histogram. This boosts the deepest, most saturated areas of the neon spot color to 100%, while ensuring the midtones and highlights scale proportionally.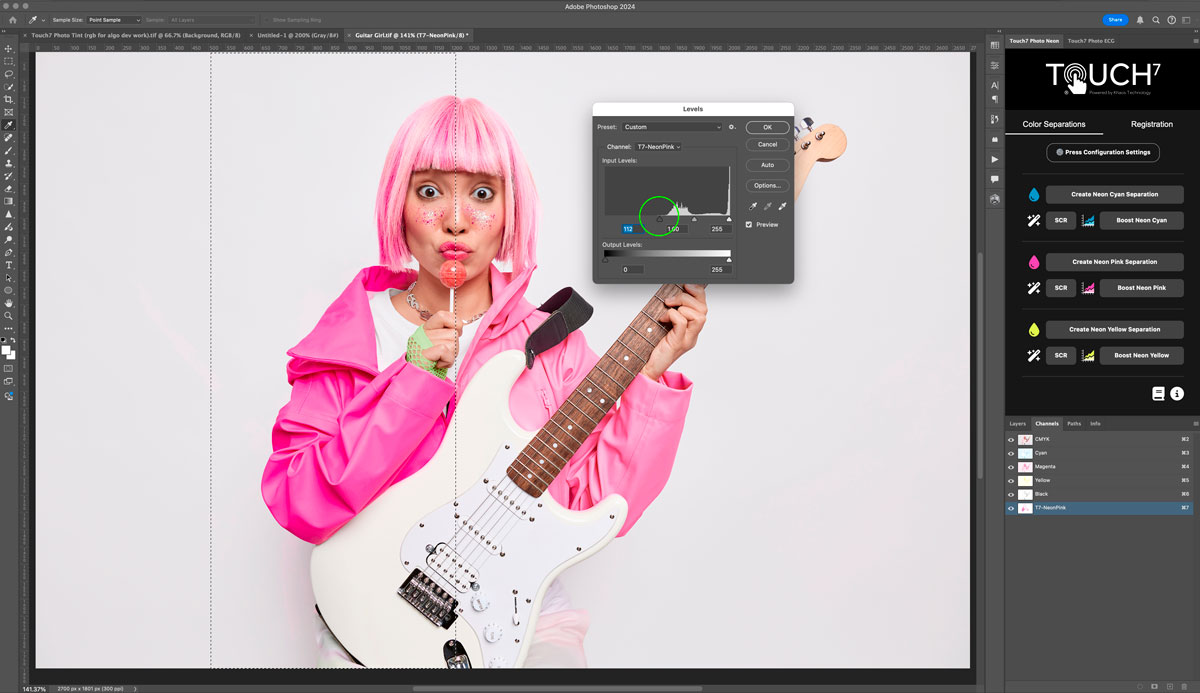
-
Using g the BOOST buttonThe BOOST button increases the overall neon intensity in 25% increments. Each boost adds another 25%, enhancing vibrancy across the entire separation. This provides a quick and efficient way to amplify the neon effect.
You can also selectively boost a specific area of the spot color by creating a selection. In this instance we are selectively boosting just the left side of the image.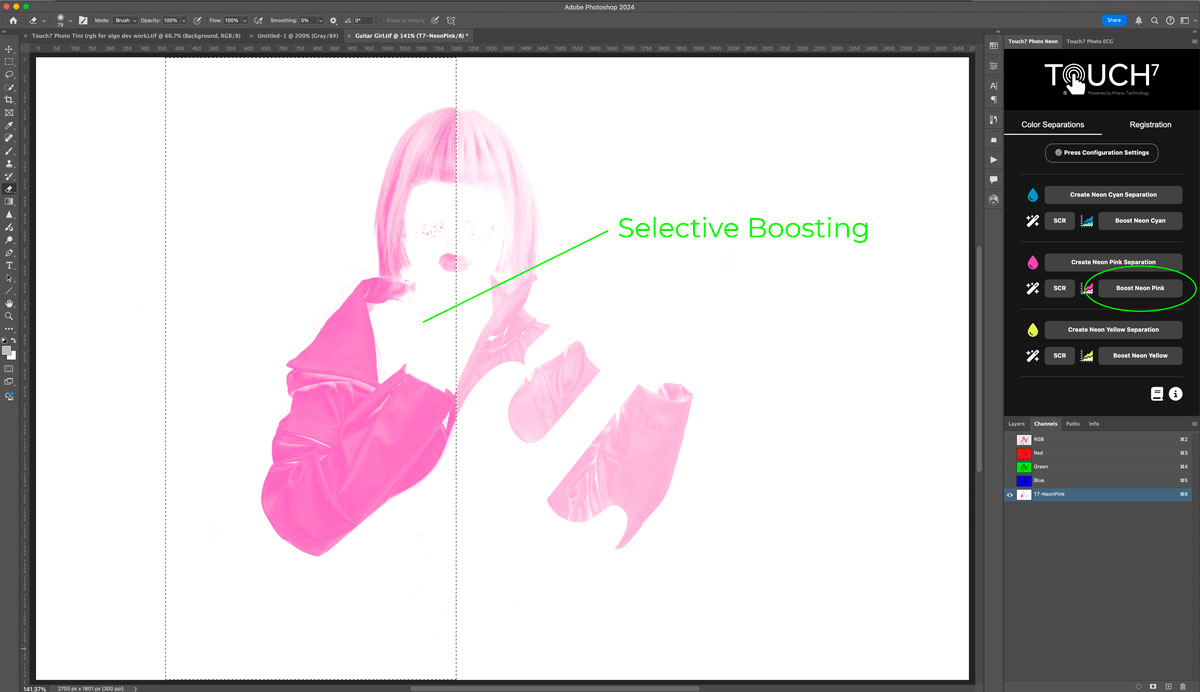
-
-
Color Palettes for Adobe Illustrator
No results were found
-
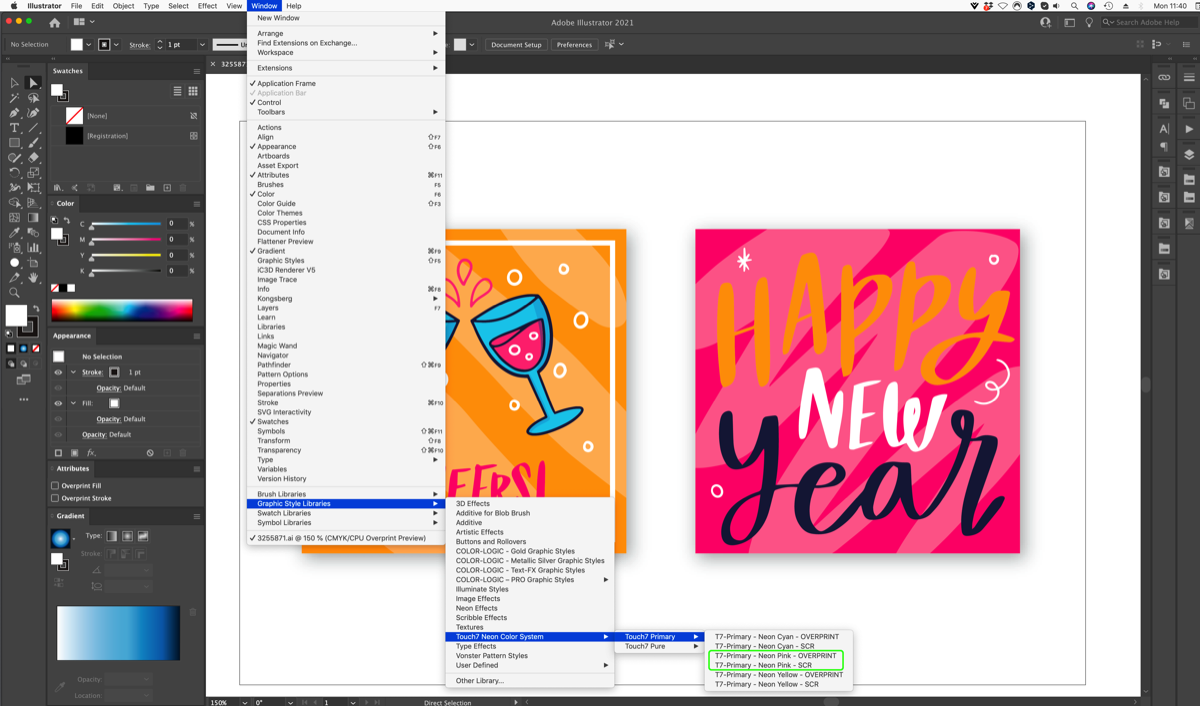
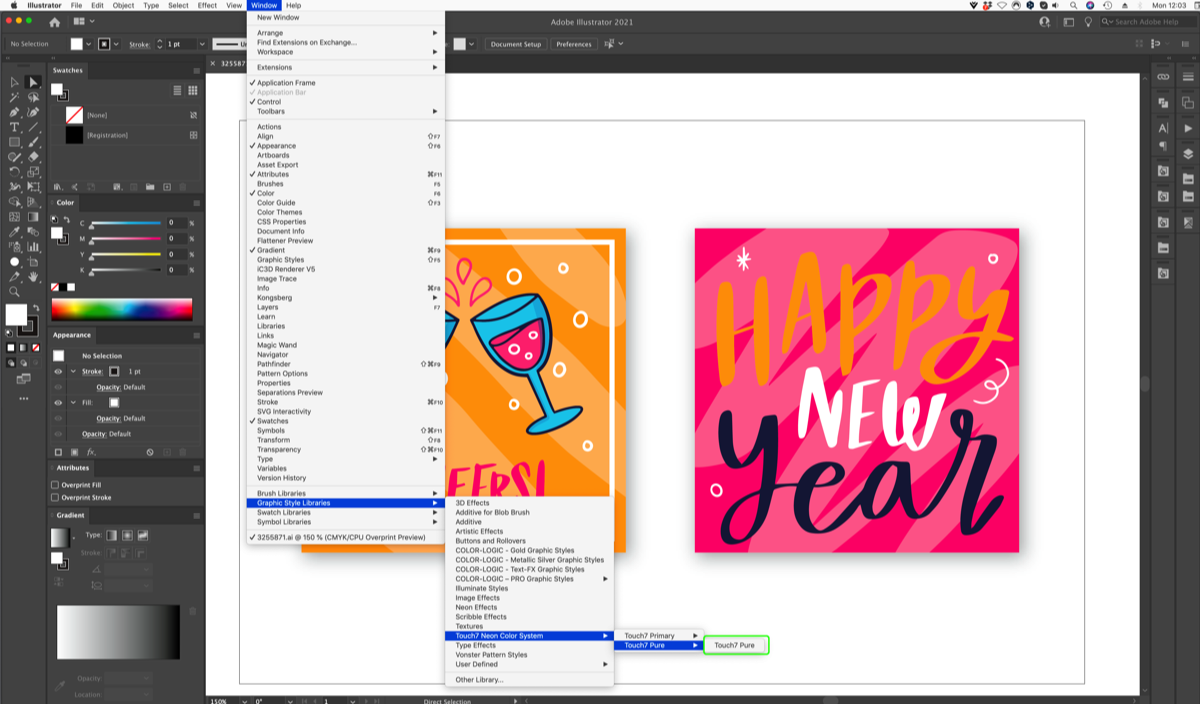
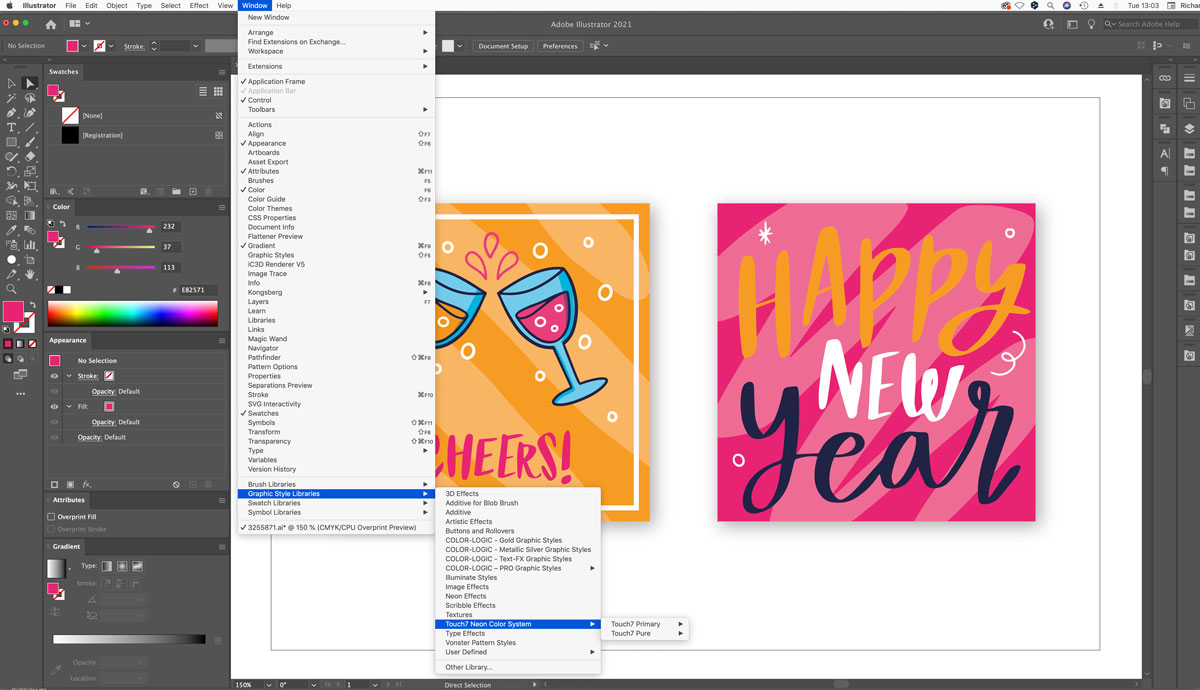
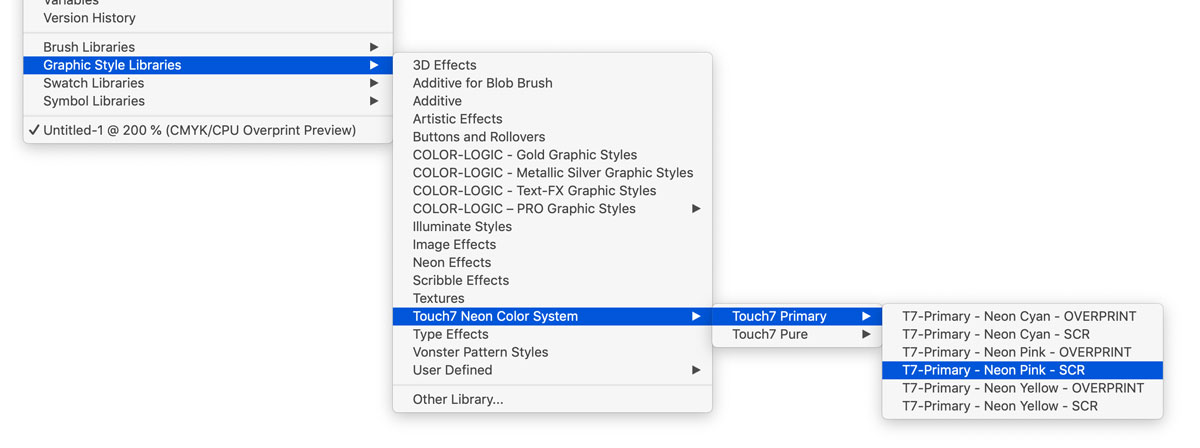
Adobe Illustrator: Where to find the Touch7 Graphic Style paletteTo access the Touch7 Graphic Style palette go to the “WINDOW” menu and then scroll down to “GRAPHIC STYLE LIBRARIES” where you should see the Touch7 Neon Color System folder.
Select the graphic style palette for the appropriate Neon Color System you are using. For example Touch7 Primary > Neon Pink SCR -
Adobe Illustrator: Adding a neon color to your artwork
To add a color to a specific vector graphic, simply drag and drop the color from the palette onto your artwork.
TIP: If you have a group of differently created items on your design, such as fills/gradients/strokes, you may need to un-group those items so that you can apply the Graphic Style to the specific fill area only.
Note:
Touch7 Graphic Styles contain overprint settings – please switch on OVERPRINT PREVIEW (Window > Overprint Preview) to see your designs correctly. -
Adobe Illustrator: Working with strokesThe Touch7 Graphic Style palette is designed for "FILLS" – if you want to add Touch7 neon colors to your strokes, the easiest way would be to "outline strokes" which will turn your stroke into a fill that can then have the Graphic Style applied.
If you would prefer to keep your strokes so that they are editable, you can manually set up your stroke – We provide an in-depth tutorial video inside the Members area that shows how this is achieved. -
Adobe Illustrator: Tips and Advice
If you find that your artwork is not coloring up after dragging a Touch7 Neon color from the Graphic Style Palette onto your artwork, it could be that your vector element is grouped with other elements that cannot be used with a Graphic Style. We would advise you ungroup and try again.
-
-
Color Palette for Adobe InDesign
No results were found
-
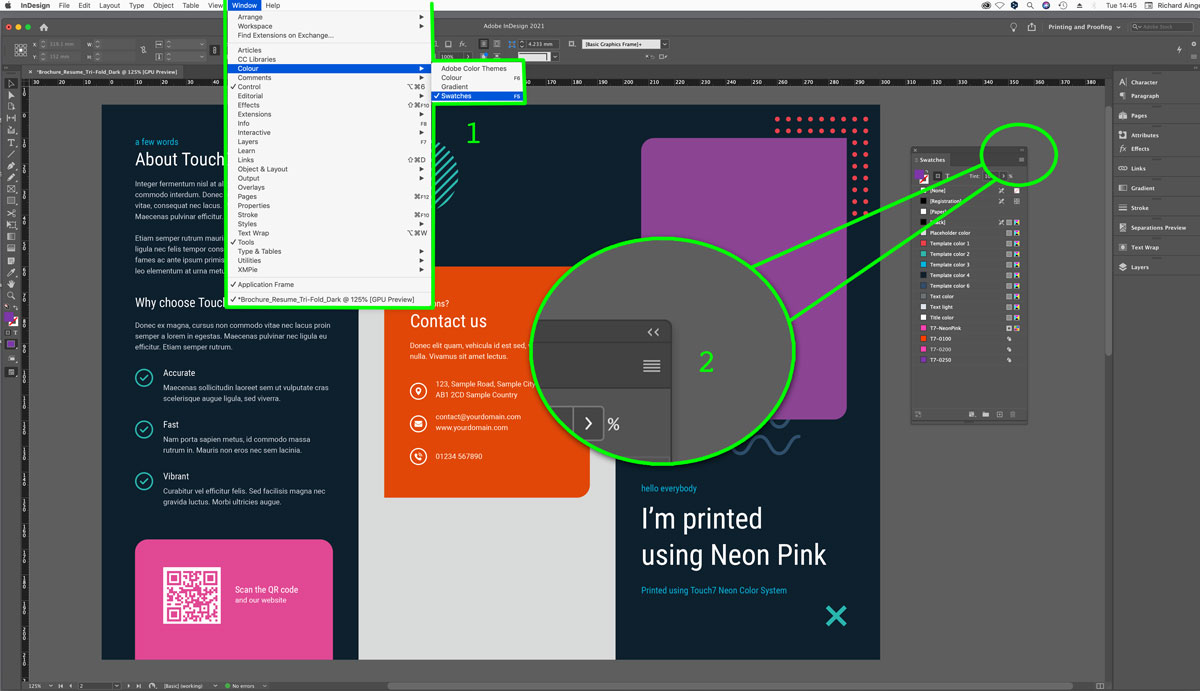
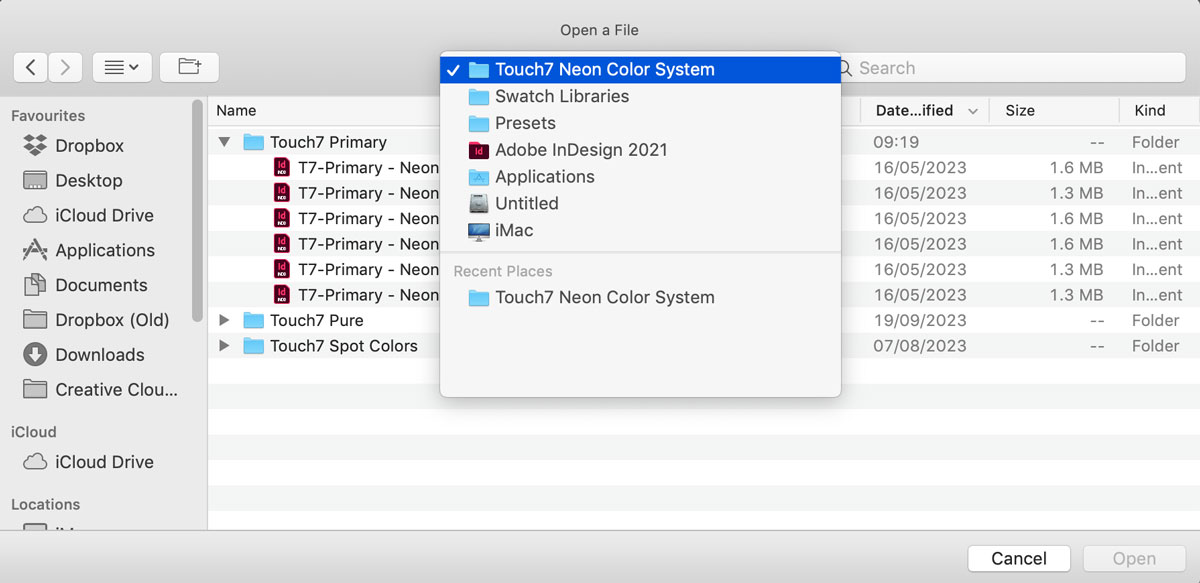
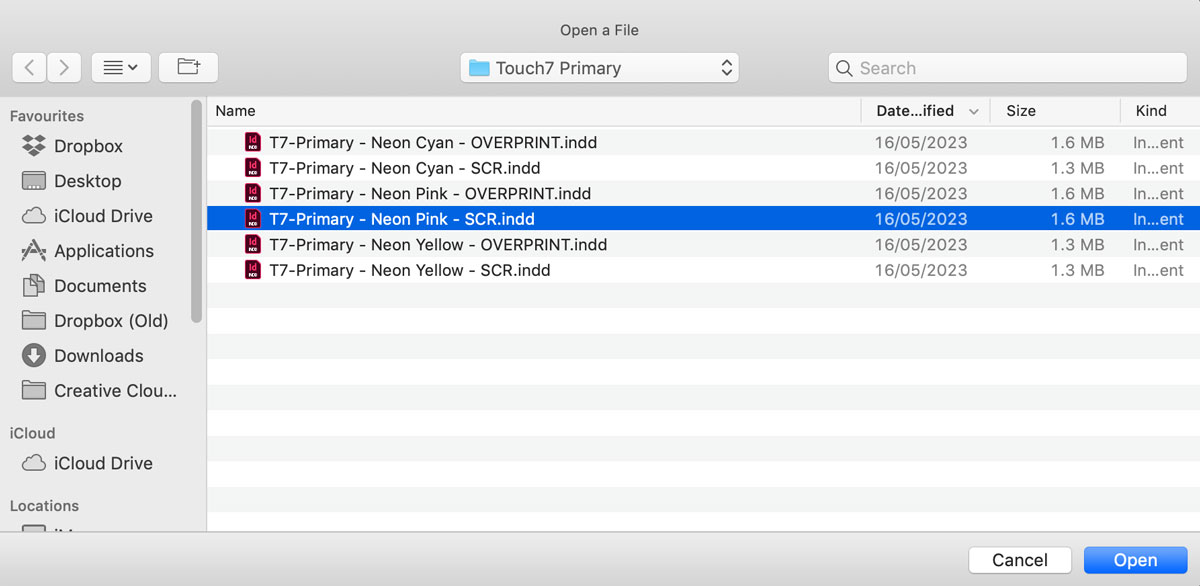
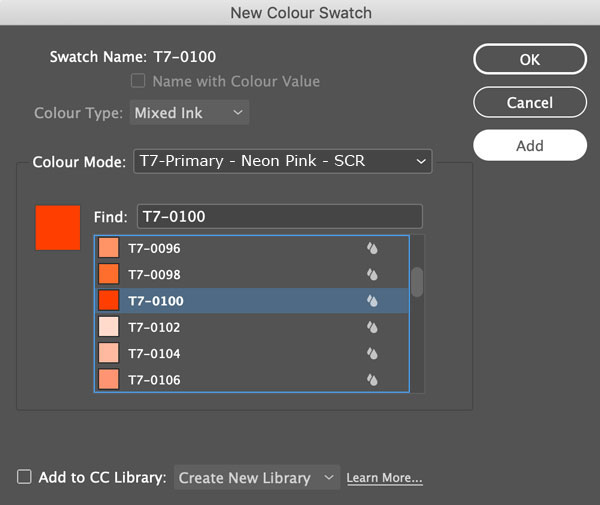
Adobe InDesign: Where to find the Touch7 paletteThe first time you work with one of the Touch7 Neon color palettes for InDesign, you will need to manually load it. You only need to do this once! (Provided that your computer doesn't crash before you quit from InDesign, the palette will be in the drop down list the next time you open InDesign). The following procedure would be applied to each of the palettes you wish to open.1. Open your “SWATCHES” window (Window > Color > Swatches)
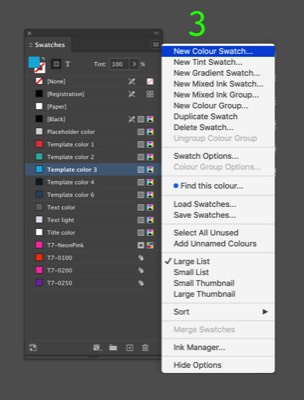
2. Click the the sub menu in the top right of the swatches window3. Select NEW COLOR SWATCH …From the new window that opens up:
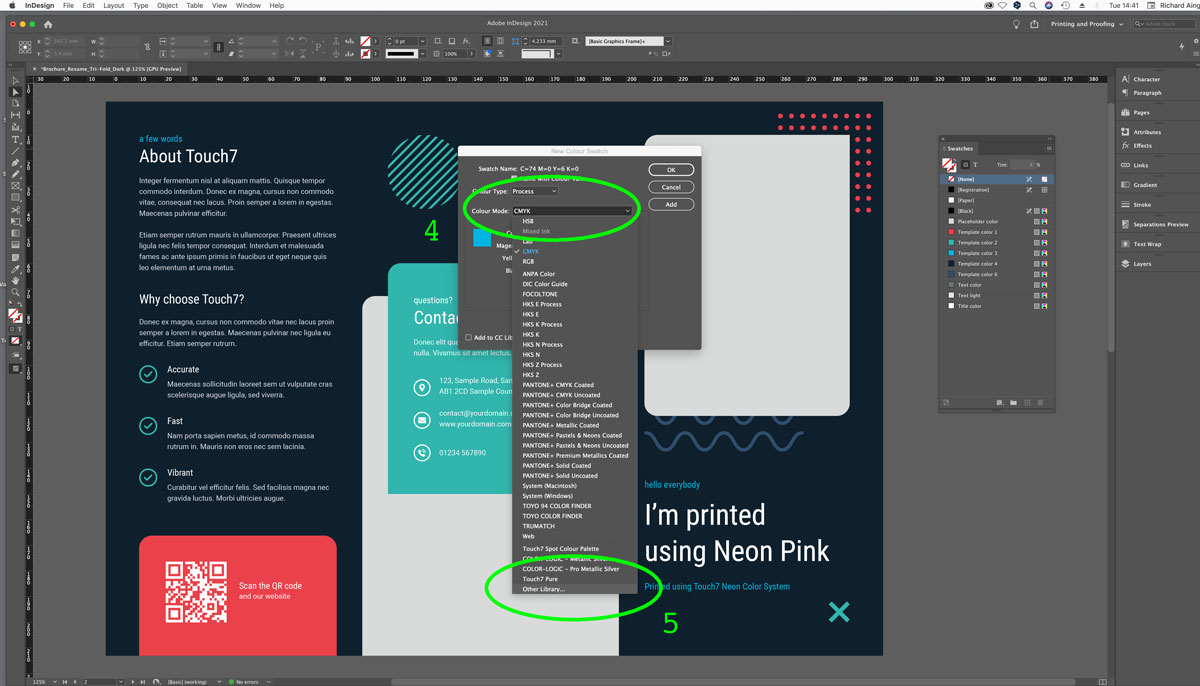
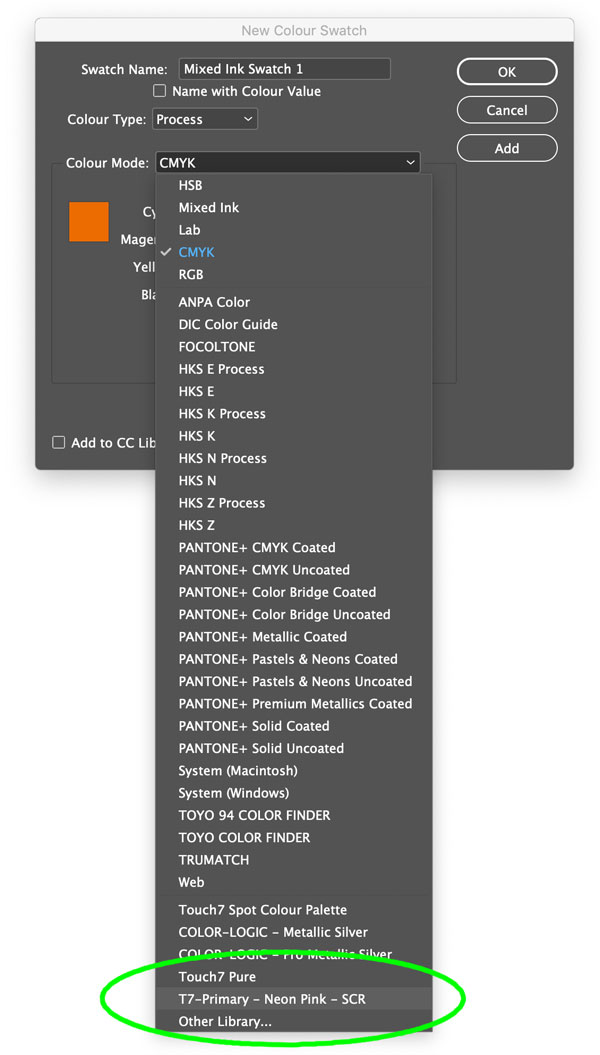
4. Click the COLOR MODE drop down menu
5. Select OTHER LIBRARYThe next time you use InDesign, you will now see the palette you added in the list. To add more swatches to your document, you use the same process as above: Swatch > New color swatch > Use the drop down menu (color mode) to access the palette you loaded: -
Adobe InDesign: Adding a neon color to your artworkWith your swatches added to your swatch palette, all you need to do is select your artwork and click on a color.
You can apply the InDesign swatches to any element, text, fills, strokes or even make gradient blends between different neon colors or blend neon into CMYK for something a little more creative.
-
-
Adobe Acrobat
No results were found
-
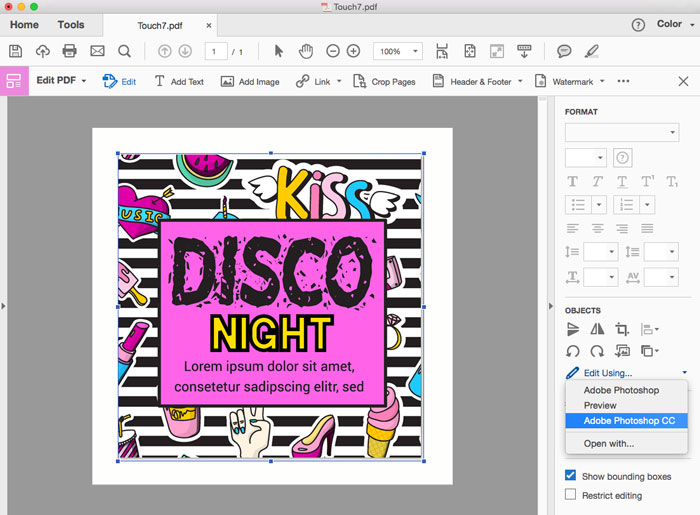
Converting customer supplied PDFs into metallicTouch7 can be used to process images and vector graphics within a customer supplied PDF – However, due to the limitations of Adobe Acrobat, it’s only possible to process one image at a time.
 Step 1
Open your PDF file using Adobe Acrobat (requires a full version of Adobe Acrobat Pro/DC)
Step 2
Using the Adobe Acrobat Tools, select the “EDIT PDF” function.
Step 3
Select the image or vector graphic you wish to convert and go to the “EDIT USING” feature, and select either Adobe Photoshop or Adobe Illustrator depending on what you are editing.
Step 4
Your image or vector graphic will then open up in in Photoshop or Illustrator – For Photoshop, process the image using the Touch7 Photo Neon plugin, and once you are happy with your file conversion, save and close the image. For Adobe Illustrator, use the Touch7 Neon Graphic Style palette to add neon colors to the vector graphic, save and close the file.
Step 5
Next, go back to your PDF in Adobe Acrobat and your image/vector will automatically update, bringing in the extra Touch7 spot color(s).
-